Monday, November 26, 2012

I have a question for you. (Lovecraft fans will get this post.)

It's me again.

Who else?  I feel like my eyes require bedrest.  During this holiday season, I feel it's impossible to have a set schedule of simply eating or sleeping.  For a creative working college student like me, the schedule varies from working job one and job two, writing papers, doing homework, reading books, teaching children about art, and actually doing my own art.  I've been eating Instant Lunch and working the midnight shipment shifts this week, but in the midst of all of that, at least it was a good Thanksgiving.  I hope you all have had a good one, too!

In my quest to finding a good steampunk aesthetic for my claywork (if that's a word - you know what?  Too bad.  If not, it's my word now!) while simultaneously trying to find the time to actually work on it, I've come to sort of a conclusion. You see, I've been working on purely functional pieces with hints of steampunk design (note the gear trinket bowls - more designs of those are coming soon!) and I worry that I'm not pushing it far enough.  I've made some yarn bowls with tentacles that I feel are pretty successful.

This was taken before it was glazed.  To be shown finished in a later post!
Taken before it was glazed.  It's a different bowl with the same concept.  To be shown finished in a later post!
I've decided to make more flasks as well.  The flasks that I've made last semester (some shown below) all came out pretty well.  I mean, I'd rather go with some simple carved designs rather than have raised designs on them, but all in all, they fuction pretty well.  I mean, I used mine at the Steampunk World's Fair last year.  All they need are corks, really.  They each hold about 6 fl oz.

A raised design that I think is less successful than my simpler examples.

My boyfriend took this picture.  I think this is the best example of my raised designs on the flasks.  This is his flask. :)


Same 'crayon' thing used as in the cameo flask!  Wierd!
Less successful raised design, yet the glaze effect is pretty interesting.

 But other than that, I'm just not satisfied enough with my own work. Be it the Artist's Curse for never being satisfied with one's own work or not, I still feel like there's so much more to be done with clay.

And then, I had a dream.

Can't say for sure what it was, though.  Can't remember a thing.  I know, right?  You're probably asking yourselves: "If you don't remember anything Kelly, then how do you know that you've had a dream?"  Well, I'll take that question, and raise you a picture.

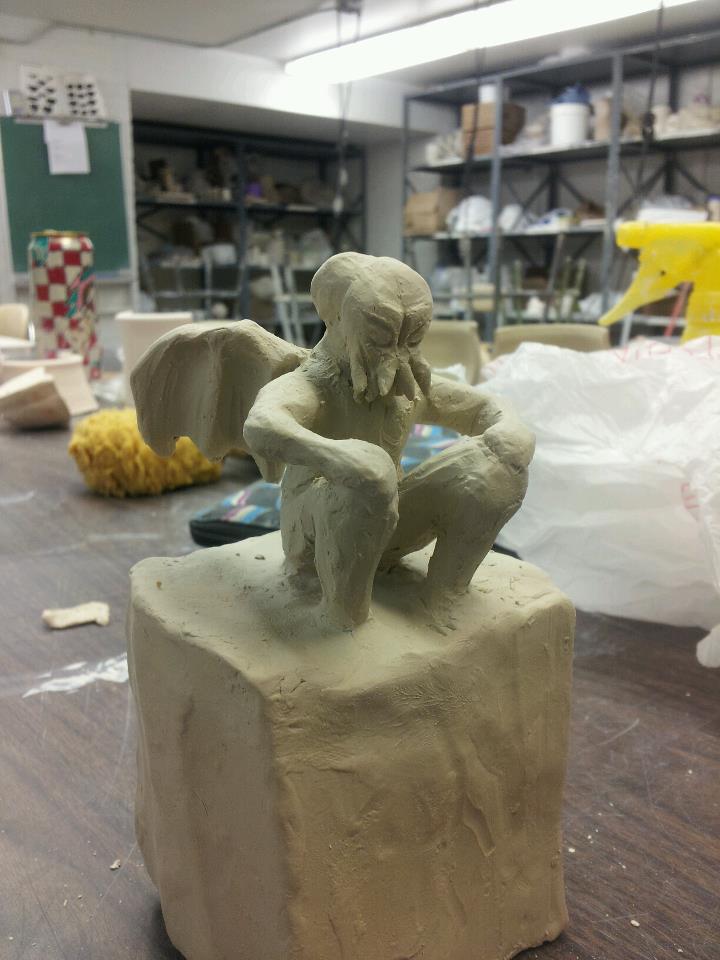
PH'NGLUI MGLW'NAFH CTHULHU R'LYEH WGAH'NAGL FHTAGN
Can you believe I did that?  I didn't even know it.  I woke up to find it there one night in the ceramics room, with my initials at the bottom, and in my handwriting.  The only conclusion?  I must have carved this beauty in my sleep.  I'm not sure what it is, exactly.  Looks like the body of a human, the wings of a dragon, and the head of an octopus.  There must be a name for it somewhere.  I wonder what it is?

I don't even remember writing the caption just now!  What a load of gibberish!  I must have fallen asleep and hit my head on the keyboard or something.  Hey, I'm tired enough to have done that.  Anyway, I'll keep it there for your amusement regardless.  Maybe someone out there can interpret something out of these letters, like maybe there's a word or two hidden in there in another wierd language.  Wouldn't that be funny?!

Well, here's my question for you:  What do you make of this?  I think it's a result of me dreaming, or dream-sculpting rather, during the long late hours of the night in the ceramics room of my university.  Anyone else have any other interpretations?  What should I make of this?  I mean, is it a horrible abomination of my ceramics handbuilding skills?  I'm almost thinking I should throw it away.  I mean, it kind of creeps me out.

...

Or I should just cast it and mass-produce it for all of those strange geeks out there who like this sort of thing.

I'm out.  I'm going to bed.  Even though I keep falling asleep, I feel like I'm not even getting any rest from it!  See you later!

Wednesday, October 24, 2012

First Ever Item-of-the-Blog: Gear Bowls!

Hello, friends!

I know, it's been a while.  My college program and work have both kept me pretty busy!  But it's okay, because I have some news to report!

I have finished a batch of some raku tester bowls.

I just put a gear on it and called it Steampunk.
And now that song is in your head.

Do you like them?  Let me describe what I did here.  If you look closely, all three of the bowls have a lip which was shaped in order to look like gears.  Then all of these bowls were bisqued fired and covered in two of CCSU's house glazes (dipped, one after the other) to get the varying effects after the fire.  My aim here was to design a steampunk-inspired bowl that was simple enough to create yet interesting enough to fit the genre.  As you can see, the combination of glazes gave each piece a certain degree of texture while still giving off a metalic feel.  And what better way to introduce the ceramic medium to the Steampunk genre than making them look like gears?

I'll show you a bit of detail on each.


This piece has the obvious stand-out finish, yet I cannot decide if it is my favorite one.  As you can see, it's much shinier and smoother than the other ones, with more muted tones.  This one is definitely the 'clearer' of the three, if not the most distinguishable.


I feel as if the finish on this piece has achieved the perfect balance between texture and the color of the metalics.  I love the variety of color I got in this one.  Blues, greens, reds, and purples, and even some gold-ish looking yellow tones make this piece look really interesting to me, so needless to say I was really satisfied with the way it came out.


This one came out pretty interesting.  This one had the most texture of all, and reminded me of molten lava.  I still have some pretty good colors in this one, too.  Next time, I plan on spraying on the second glaze rather than dipping it, because (and you can tell) the application was pretty thick dipping it in.

I tested these bowls in order to see the finish because, if I have achieved a desired or at least interesting effect, I would like to sell them.  Which makes these little guys the first ever ITEM OF THE BLOG POST!  These are NOT food safe.  I plan on uploading these guys onto an account on Etsy once I get better photographs.  But until then, if you would like a bowl, you are definitely welcome to email me with an offer!  You see, I have only shared my blog with my Facebook and a few other people.  So consider this an 'Offer of Aquaintance.'  Yes, my friends: YOU have first choice!  Whether you know me or not, whether you are friends with me on Facebook or not, if you can see this post, this offer is for you!  Yay you!

Email: kellyr@my.ccsu.edu

(*^Keep in mind I am majoring in Art Education, and not Advertising.)

Anyway, I think this Item of the Blog Post thing may just inspire me to keep making interesting steampunk-ish items that can be used around the house.  I plan on keeping one and using it to store loose change!  So, keep your eyes peeled for another one!

Also, next time on the blog (Next time on: The Blog! Sounds like a television show to me!) I'll be uploading some pictures of my past work.  Pictures that have been saved thanks to Facebook, pictures that I end up taking because of the computer crash that happened a while back.  You can tell me what objects to keep making and what objects I should just forget about!  And then I'll consider it.

See you all later!  As always, thanks for reading!

Wednesday, September 26, 2012

Everyone look at my boyfriend's blog! - Oh, and Steampunk Personas

As promised, months later, I bring you a new blog post.

I hope my boyfriend, Ryan Gelgud, doesn't mind if I use his website in this post!

Cryptobotanist is a journal-styled blog filled with entries of a captain's adventure into horror and madness.  Based on the novels and short stories of the great H.P. Lovecraft, professor Phinneas Troughton battles for his own humanity as he pilots himself and the remainder of his crew towards the source of insanity that has infected them.  Eager to study this strange otherworldly being and yet suffering under the poison of its sting, he battles his persuit of the terrible monster between fascination and revenge.  Only a few posts have been created, however.  How about showing him some encouragement? :)

This brings me to a point in the blog where I start wondering to myself: how important is it to have a steampunk persona?

This, of course, all depends on how active you'd prefer to be.  For Ryan, I suppose he created Troughton as his own steampunk persona.  Personally, I've invented my own character for my own steampunk purposes.  But I find a key component in order to consider the idea is this first question: what do you intend to do with it?

Here's a list of possibilities.  If you have anything you'd care to add, please post a comment.
  • A means to express creativity through writing, posting videos online, drawing pictures, etc.
  • A tool for business; a self-promotion
  • Developing a social presence within the community
  • A reflection of your own interests
  • An alter-ego to be used within tabletop RPGs or LARPing
Take my persona, for example.  Let me introduce you to a lady I'd like to nickname Lucy.  First, I started creating her as a means of collecting my own thoughts, styles, and interests and compiling it into a storyline.  Thus created her backstory.

Lucy:
  • Is British, because I love their accents
  • Lives in America, because I live in America and I am American
  • Lives in a small western town, because I love the idea of a Wild-West scenario and I don't enjoy big crowds
  • Is part French, because I like to include British, French, and American-style aesthetics to my costumes, as well as because I am part French-Canadian
  • Has her own cannon, because steampunk weaponry is a 'thing' and I like the idea of the whole 'little chick with a big gun' theory
  • Finds herself in time-traveling situations, because I love Doctor Who
  • Works as a barmaid in her own time, because I like to make functional ceramic pieces that can be used in such places
Some of it might be a bit - what's the word - abstract?  However, this is what I wanted and these are the reasons why I wanted it this way.

Then I started to create links in between these interests:

Lucy moved from Great Britain to America following her lust for adventure after hearing about America's rush for gold.  However, after catching an airship overseas, she realized that particular adventure would not happen for her when she followed a group out west and got stranded due to failure - and thus lack of - transportation and supplies.  Thus, she and the group were forced to settle, creating a small makeshift town in the middle of nowhere.  Eventually, aid had arrived, but by the time that happened the townsfolk had gotten word from the same transport ships that going west for gold was next to useless, since the majority of people who had been able to reach their destinations found little to turn to profit.  A sleepy routine of a town, the most activity it had ever received was a random passerby or a local bar fight at her place of employment, the local tavern, where they all called her 'Miss Lucy' (Or 'Lady Lucky', a play on her name, because the only way she would end up making extra money was helping the men cheat at cards.)  Until one day, Lucy decided to travel to the outskirts of town, where she found a rather curious cavern with a rather curious cracked rock wall.
Thus, hilarity ensues.

Not the BEST concept, but still, it's a start.  I'm always re-thinking the backstory, or my persona's ultimate goal, of which I haven't decided on.  But you get the gist of it, right?

Not all personas have to be this detailed, even though some go even farther into detail.  In fact, nowhere does it say that a member of the steampunk community absolutely HAS to have one.  You can actively participate by making your own art, creating a performance, writing your own stories and music, inventing things, creating costumes, and simply communicating your own ideas within the community about steampunk itself.  But does it help?  Depending on who you are, it may.  It certainly helps me.

Well, my dry eyes and lack of focus are telling me that it's my bed time.  I promise that I will try my best to incorporate a lot more about clay into the next blog post.  Also, probably some fun pictures!  Until then, my fellow people, enjoy yourselves!

Friday, July 6, 2012

A Little Snippet to Hold you Over/What's to Come

Greetings and Salutations!

Why has it been ever so long since I updated this blasted blog of mine?  Lots of things - good and bad - have blocked me from focusing on this blog, and before I can wrap my head around all of the content I've yet to upload, I at least feel like I need to give all of my three viewers or so (I mean gosh, I know I'm not popular yet, am I?) a heads up on what's been going on.

So my last post was what, in April?  Since then, I have received my finished products of my flasks out from the fiery depths of the gas kilns and I have to say loves, they look pretty good.  I'm making some more over the summer and that way, I'll have some things ready to throw into the kiln come the start of next semester.  That is, if my professor will let me back in to take ceramics four.  Either way, hopefully we'll have some pictures soon!

Immediately following my release from education I attended the Steampunk World's Fair in Piscataway, New Jersey with a couple of friends of mine and my boyfriend.  All in all, we had a pretty good time.  And guess what!  I found someone who, just like me, is going to school for ceramics/pottery and wants to bring the steampunk aesthetic into the medium and vice versa!  I still need to email her, but trust me, the half-hour geeking about different types of clay and kiln methods proves that she's a pretty cool gal.

And to the reason I have not updated the blog nor emailed anyone about it: My lovely computer's hard disk failed me without any warning.  Currently, I am typing this on a laptop with no saved memory of a single picture or document that it used to have before the crash.  We had to get a new hard drive and install vista instead of seven or XP (I own a PC, not a Mac, for those of whom were wondering) because we can't find any of their discs.  So needless to say, I had nothing prepared.  And I was very sad.  I still am, but I'm not giving up hope that we can still get all of my precious documents back!

So coming up in news, we have: Information and photographs of how the flasks (and others) turned out, all the fun things we did with the cool people from the Steampunk World's Fair, new pictures of my current projects, and a few new things to the blog.

For one, I'd like to introduce you to my boyfriend's new blog.  He embraces his new steampunk persona and writes journal-style about his Lovecraftian adventures.  More information coming up within the next few posts or so!

Also, I'd like to start a little side-project via webcam.  I'd like to call it 'Project SteamPlay'.  Introductory and Starter videos to be posted within the next couple months when I can get around to it, but the main ideas are these: Roleplay.  Steampunk persona.  Webcam.  Steampunk Community.  I hope you can guess the rest for now!

Until next time - Steam ON!

(I promise I'll never say that again.)

Kelly

Thursday, April 26, 2012

The Fantastical Amazingness that is Pit Firing

I've attended my first ever pit fire party on Tuesday night.

Lindsey (left), me (center), and Paola (right) hanging together at Vicente's studio during the pit fire party!
To be honest, I was quite worried about what I'd write today.  But my professor, Vicente Garcia, was kind enough to invite us to his studio so the upper level ceramics classes can fire a few of our pieces in his pit fire.

Can I haz ur studioz?
For the record, I want a studio space like his when I grow up.

When we arrived, the pit fire was already built with fire brick and a steel grate covering the top and the short sides of the structure.  He assigned us the job of finding small sticks.  He'd started a fire, but we needed to throw small sticks into the fire so it could burn faster and build bigger.

He then proceeded to toss in his old dead Christmas tree from last Christmas.


After building the fire a bit bigger, we then went inside his studio to learn the different methods of how to finish a piece before we put it into the fire.  We could've just put our pieces in there, but we could also cover these bisque pieces with copper mesh and slip containing things like copper, steel, or cobalt salts.  There was also a really cool copper wash we could have dipped our pieces in. 

We lined the finished pieces on the wall of the pit, and when the fire was ready for them, we put them carefully inside the open flames with steel tongs.


The palate burning in the pit fire
We gathered bigger branches and also threw in at least three palates to keep the fire burning hot.  The pieces were glowing like embers at the bottom of the fire.  And what amazing color the fire was turning!  Due to all of the different salts we added to prepare our pieces, we saw greens, blues, even purples burning away with the yellows, reds, and oranges.  It was a burning rainbow!

You can see some of our pieces, partially on fire.  The chemicals we've prepared them with are giving the fire a greenish glow!


While they were 'cooking', we all took a break and ordered pizza (we were there for a good while).  After that, it was time to toss in the fun-colored salts to make the bare pieces pretty!  And even though the fire got lower, the blues became more intense, and we saw more purples.  Is it bad that I think I was more excited about the colors in the fire?  But truth be told, I think all ceramists are secretly pyros. I know we all were that night!


When the fire died down, we needed to quench it.  First we smothered it with damp wood chippings.  Then we took the hose to cool things down.  We dug the chips out again and took our pieces out of it.


And they came out AMAZING.

My pieces are the small oddly-shaped one up at the top, and the two wide pieces, the blue one and the red one.  I call them both 'Fire' and 'Ice'.
I will see about uploading videos next week.  For the life of me I can't figure it out.  So much for trying to be tech-savvy!

See you next week!

Thursday, April 19, 2012

Starting Small with Flasks: a how-to!

I write this while sitting on my bed, sipping tea out of the handmade mug I've decided to keep. (Blueberry silver tea, pinkie-out style: I need to drink more tea to clear out toxins and junk.) 

Our kilns don't usually fire reds well, so this mug is reminiscent of a murdered cow.  Pleasant for tea!
As I contemplate this past semester (as it's almost over), I realize that I should probably show you a few things that I've made.  First thing's first: flasks.  I'll be glad to take you through the entire step-by-step process of hand-building one of your very own!

Step one: Get your pieces ready!  You're going to need a hollow coil about an inch and a half think (I used an extruder for this, but you can hand-roll these and hollow them out later.) and two rectangular slabs, one a thinner rectangular shape than the other (these will be the main sides.  You can make these as tall or as wide as you like, as long as they are the same height as what you make your coil).  I used a slab roller for the slabs, but you can use a simple rolling pin on top of two rulers. (Note: the thickness of the clay should be at least a couple of centimeters wide.  Anything less than a centimeter will break very easily!)  Shape the rectangles so it has a slight bump or curve to both of them, and the small piece can fit on top of the big piece (if you're having trouble, look at the picture below of all the individual pieces).  Note:  If the clay dries past the stage you need, you can always wet it with a damp sponge or spray bottle.

Step two:  Wait until the outside of the clay is at a leather-hard state (that's as far as being pretty stiff but not as far as the clay starting to change to a lighter color).  Cut the coils with your wire tool, straight up the middle and being careful to split them evenly.  If the coils you made are not hollow already (like using an extruder), now's the time to hollow them out.  Take a round-shaped trimming tool and gently and carefully take the 'guts' out of the coil.

Now, you should have pieces that look like these:

These pieces will be enough to make five flasks.
Step three: Now it's time to slip and score!  This is a very important part of the process, and you need to be very careful on how you join these pieces together.  First, score the sides (the widths of each piece) with either a needle tool (don't be afraid and criss-cross the lines, but don't get too deep!  You also want to keep the shape of the sides as well) or a scoring tool.  then, before we add the slip (slippery mayonnaise-like clay) I usually like to re-wet the surface of the scored parts, just in case.  Once the edges are slipped, it's time to join them together!  This gets tricky, too.  remember, you're joining a half-coil to the long side of the big rectangle (so the bump is on the outside) and the long side of the skinny rectangle (so the bump is on the inside).  I usually like to stand all of the pieces up for this part, because I find it easier to keep everything together.  Truth be told, they're going to want to fall apart on you.  Note: it's good to press firmly, but you also need to be delicate with leather-hard pieces.

Step four:After the sides are joined by slipping and scoring, you're going to want to take another, non-leather hard piece of clay and press it into each side (inside and outside) of the joined parts of the structure.  If there's too much slip, wipe it off before pressing.  Rub the clay in, smoothing it, so that it gets into all the parts you couldn't join together before.  I usually like to finish it off by smoothing it with a slightly damp round sponge.

Step five:  Now that you've got your structure, it's time to make the top and bottom.  Roll out another slab big enough to make a top and bottom.  What I do here is trace my structure lightly with a needle tool and then cut it out.  Repeat this again until you have one top, one bottom.  Bring these pieces, being careful not to smoosh or stretch them, to a warm, dry place to get leather hard (and it might be a good time to put your structure into a plastic bag so it doesn't get past leather hard).

Step six:  Slip and score the edges of the structure and around the sides of the top and bottom as in step three and attach them in the same manner as steps three and four.  Put it back into the plastic bag.

Step seven:  Take a long, thin rectangular shape of slab (not leather hard - yet) and wrap it around something small and round, like the end of your bigger, round trimming tool (that's what I usually do).  Slip and score the edges that meet and attach them together.  Wait until it's leather hard, then score the edges of one side of the loop.

Step eight:  Take the structure out of the bag, and place the loop in the center of one flat end.  Trace the inside circle, then cut it out with the needle tool, being careful not to let the circle of clay drop inside.  Score this part around the empty circle of the top of the flask, then wet and add slip to attach it together, after adding clay like steps three and four again.

The finished and smoothed flask in its leather hard stage.
Step nine:  You now have your basic flask structure.  It may be a bit bumpy on the outside.  This is when I take my large round trimming tool and run it over around the structure gently, to remove the lager of the bumps.  Then, I take my slightly damp sponge and rub it over the flask, removing excess clay and slip.  At this point, you can leave it out to dry completely and get the finer details smoothed out by running your damp sponge over it again, or you can leave it leather hard to add a design, making a step ten.

Step ten (optional):  you can add designs now, if you like.  I've carved designs out of the front, and I've added some designs out of other slabs and carving them as well.  Here are some examples of designs I've made:

This is my boyfriend Ryan's flask he will be receiving to use at the Steampunk World's Faire 2012.  Has not been bisque fired or glazed.
Another flask I've made simply by carving out of the front.  As you can see I've made my own pattern so I can recreate it.  This one has been very popular with my friends, so good thing!  Has not been bisque fired or glazed.
Happy flasking!

Monday, April 16, 2012

Personally Defining an Ever-Changing Term: Part Two

One person I met within the steampunk subculture, Justin Stanley, known in the steampunk world as the Emperor of the Red Fork Empire, has created an entire world (rather, a fabric of worlds) based on allies inside of the community.  An artist working with illustration, graphic design and found-object art, he is associated with people such as Dr. Grymm and the Wandering Legion.  The stories as well as the aesthetic behind Stanley's individual creations reveal a high level of imagination and creativity.  I've had the pleasure of meeting this Emperor, along with his trademark logo and mechanical fist he has named 'the Will of the People', at the Live Steampunk Chess Event at the Essex as well as the Steampunk World's Faire 2011.  Ever since then I've been browsing his website (and I mean, that stuff's got a -lot- of content!) and I'm happy to say that he serves as one of the inspiring members of the steampunk community for me.
Justin Stanley, a.k.a The Emperor, kindly posing for me after the Mad Tea Party event at the Steampunk World's Faire 2011
I also have to mention Vicente Garcia, another artist who has been an inspiration to me ever since I transferred to a four-year college.  While he may not entirely be considered a 'steampunk' artist, he happens to currently be my professor and works with steel as well as clay.  I consider his aesthetic within the forms (which are mostly vessels) to be lightly linked with the aesthetic of the steampunk genre, though when I first communicated the term to him he didn't exactly seem to know what it meant (then again, who knows -exactly- what it means?).  As an artist, he displays unbelievable craftsmanship (I mean, this guy could make throwing giant vessels look like a two-minute job.  Can you throw a giant vessel in two minutes?).  As a professor, at first I thought he was very demanding.  But as it turns out, being an artist is indeed a very demanding job, and he should know.  Pushing us students is just his way of saying something to the effect of "listen, it's a tough world out there, so you have to show them that you're a committed hard worker."  What results after this semester should be very interesting.
One of Vicente Garcia's clay-and-steel forms

Thursday, April 5, 2012

Personally Defining an Ever-Changing Term: Part One

I certainly do not claim to know all there is to know about steampunk.  After all, I had just discovered what it was two years ago, at an anime and video game convention.  Besides, I truly believe that there's much more to discover about this genre in it's lifetime - which I'm proud to predict will be very, very long indeed!

However, I do perceive steampunk a certain way - a way which many may or may not agree with.  Let me just start off with an overall list of what types of items or symbols I have come across that seem to represent the genre to me:

  • Gears and Cogs (this one's a big one!)
  • Leather
  • Brass, copper, and to a lesser extent, silver, gold, iron, or any other kind of metal you can possibly imagine
  • Corsets
  • Bustles
  • An octopus (Or Cthuhlu - steampunk fans seem to get a kick out of H.P Lovecraft)
  • Top hats
  •  Monocles
  • Mustaches
  • Goggles
  • Vests
  • Nifty raw-looking mechanisms
  • Pocket watches
  • Brass keys and locks
  • (Arguably) Gas masks
  • Upcycled bits
  • Steam!
There you have it.  My version of steampunk at a glance.  Now of course, there may be things I still need to add on to this list.  However, these items are recurring themes that I have seen in my travels these past two years that relate to the genre.

I've come to find out that the whole subculture of steampunk actually originated as a type of literature.  Essentially what steampunk was made out to be was Victorian science fiction.  Writers, sometime between the 1980's and 1990's, imagined a place during that time period where steam-powered inventions ruled the day-to-day lives of its citizens.  I'll admit that I still have yet to get the exposure I want to these books, but as soon as I get the means to find them, I'll be going through them like crazy!

So what exactly have I seen to get me exposed to this kind of aesthetic?  Let's start off at the very beginning, where my boyfriend Ryan and I attended our first con.  Now, as I've said before, it was at Connecticon, which is basically a sort of generic 'B.Y.O.G.' (bring your own geekiness) type of convention.  I mostly went because I was a hardcore gamer at the time (Ryan and I love the Zelda games!) and I've seen one or two animes in my lifetime, so we decided to see what these things were really all about.

Ryan and me as Link and Malon from Zelda: Ocarina of Time.  Probably the dorkiest pictures of us of all time.  Thanks to our friend Josh for showing us around our first Con and taking this picture!
Of course, I had to dress up in a costume.  HAD to.  I used to go to Renaissance fairs all the time (mostly the one in Tuxedo, NY) and for me it was the only way to go to have fun, actually be a part of it all.  So, me in my makeshift Malon costume and Ryan in the Link costume I had made for him at the beginning of the summer, we stumbled across a panel that had a certain amount of intrigue.

There was a panel by a group called The Wandering Legion of the Thomas Tew, a band of energetic charismatic people who create web videos having to do with the group's imaginary shenanigans between each others' alter egos in a steampunk setting (usually aboard their ship).  They certainly had a thing or two to say about what steampunk is, may be, and how to capture the aesthetic via costume or props.  From their presentation I learned many things, including how to reuse and recycle old trinkets around the house and that as long as you have the right tool for the right job, anything you can imagine can be created from almost anything.  Ever since I have been such a fan and even had the honor of briefly working with them to help open a show at the Peabody Essex Museum in Salem, Massachusetts with Steampunk Chess! (At the Man Ray/Lee Miller, Partners in Surrealism exhibit in 2011.)
Logo for The Wandering Legion of the Thomas Tew.  Check out their awesome videos by clicking the link above!

After the convention, as we were driving home, Ryan mentioned to me that he would like to do something with the steampunk aesthetic.  I completely agreed with him.  We mentioned the idea to our friend Josh, who we met up with that day (as it was our first convention, he kindly showed us around) and he got very excited as well.  "Let's all be airship pirates!" he exclaimed.

Fast forward through about a year after all of the costume-developing and arrive at the Steampunk World's Faire 2011 in Somerset, New Jersey.  As only the three of us were attending together (at the time we didn't quite know enough people interested in steampunk like we were) we weren't quite what we set out to be.  Also, Josh and Ryan looked more like gentlemen than pirates.
Ryan checks his pocket watch while 'smoking' a copper pipe, possibly unaware that there is a completely functional watch upon his left wrist. :D

And Josh checks his pocket watch while awaiting patiently for the convention looking most reminiscent of Charles Dickens in attire.
Nonetheless, we all arrived in full-costume, ready to absorb the atmosphere.  Along the way, we had the pleasure of meeting Dr. and Mrs. Grymm from Dr. Gymm Laboratories, who are popular in creating and curating steampunk art and organizing special events (and even contributed to a number of books including 1000 Steampunk Creations by Quarry Publishing, and was featured on the show 'Selling New York').  Ryan and I recently attended two of their events, the Steampunk Bizarre and the Steampunk Bizarre Halloween Masquerade Ball, both of which were at the Mark Twain house in Hartford, Connecticut. We also found out that Dr. Grymm a.k.a Joey Marsocci and his wife Mrs Grymm a.k.a Allison DeBlasio, the proprietors of Dr. Grymm Laboratories, have been called streampunk experts and gurus, playing big roles in the development of the Independent films such as "I am Steampunk" (watch the trailer!).  It was such an honor to get to meet them at the convention!


Dr. and Mrs. Grymm (Marsocci and DeBlasio) posing for us at the SPWF 2011 in their vendor booth.
The three of us definitely gained a perspective on steampunk after that experience.  The entire atmosphere created by the community was completely and overwhelmingly welcoming and friendly (and that's a big thing for a wallflower like me) and we saw so many people with the most creative costumes and contraptions.  We learned that most steampunkers who put themselves out there have alter-egos that allow them to become an entirely different person at the conventions, and that inspired us to try and develop the sorts of back stories we're still working on today.

Friday, March 30, 2012

About "Steampunk in Clay"

Wow, would you look at that!  This is my first blog post ever!

Just imagine I'm giving my 'thumbs up' in this picture.  So excited.
Hooray!

Now that I'm done giving myself a congratulatory pat on the back, I should probably explain why I decided to start this blog in the first place.  But first, you need to go through a bit of a back-story to understand.

My name is Kelly, and I'm an art education student.  I basically learn how to teach other people art.  What art is, what different kinds of art there are in the world, what techniques can be used to create art, art in history, and all those exciting, creative, beautiful, thought-provoking, chaotic, meaningful, moving elements involved with it.

So basically, I'm an art education rookie.

And I probably always will be a rookie.  You know how those artist types are, anyhow.  Too picky, perfectionists, nothing's ever, well, DONE.  And you know what?  I'm proud of that.  If someone creates something, and they say it's perfect, well that only means that there's nothing left to accomplish.  Sure, pieces can be finished, but a person can always do better.  And this isn't a bad thing.  This is our drive.  Our drive to do something great, to go beyond our limits and try something new.  I may know a thing or two, for example, about clay, but I'm not saying I'm a guru or anything.

And considering I'm still an undergraduate, I'm definitely still learning!


A 'hippo' that was supposed to be a dragon
Last semester I made my choice to declare my focus in ceramics.  There are many practical reasons an art educator may declare their focus in ceramics.  More people might want to hire you if you know how to run a kiln.  You might be able to double as a sculpture teacher at a high school.  And your body of work may just prove you know a thing or two about 2-D and 3-D design.  And... well, the list goes on and on.  However, these practical reasons are not the only reasons I have decided to make it my focus.  I tried ceramics my first year as a transfer student in my four year college (I had attended a two year community college and graduated the previous semester with an Associate's degree in Fine Art) and I wasn't all that great at it.  I wasn't bad, certainly not, but my pieces were off-center, heavy, too small, and messy.  After that I skipped a semester and decided I wanted to try something new.  With the professor's strict demands for more work in less time, I was overwhelmed.

The best bowl I have ever made

However, I missed being there.  I missed throwing clay on the wheel.  I missed creating 3-D sculptures, and I missed having the possibility of them being a functional item.  But... the things I did still weren't, well, ME.  I took Ceramics 2 the following semester but had a lot of new ideas that I couldn't create because we were still learning techniques.  But I found the time, and got better - MUCH better - at creating functional pieces.  Now, I'm actually pretty good at throwing on the wheel, hand-building items, and glazing.

Now we incorporate the "Steampunk" in our blog about "Steampunk in Clay."

I'm in the Ceramics 3 class, and at this time, everyone in the class is supposed to be experimenting with what it is that they might want to do.  I was inspired to go into the direction that no one that I've ever heard of has gone before (it's pretty much impossible to search and find this kind of stuff online yet!) - Steampunk Ceramics.

It's no secret (anymore) that I love the steampunk genre.  The fashion, the creativity, the science fiction - the geekiness!  The people in the steampunk community are absolutely wonderful and accepting, with lots of open minds about what the word 'steampunk' means to everyone.  I was first inspired by them when I attended my first convention with my boyfriend - Connecticon, in 2010.  The aesthetic appeal was overwhelming for me, and I immediately adored it.  I tried my hand at making a costume and attended the Steampunk World's Faire the next year.

Erm, private joke... *ahem hem* we've found the TARDIS.  Here's to hoping we find the Doctor this year!

Move along the timeline (very slowly, in the right order) back to present day, where I, a student in the Ceramics 3 course, choose my destiny in clay.  It's what I've been getting into lately... so I figured, why not?  People have reinvented types of clothing, music, and time itself (if you know what steampunk is you'll figure out how THAT works!), so why not reinvent working with clay into something that's steampunk?

The closest that I could come to whatever it is I was searching for was what my own professor had been doing.  (If I'm lucky I might convince him it's a good idea to let me put his work on my blog.)  He worked with clay and metals (steel, copper, etc.) simultaneously.  And the work that he produces is absolutely breathtaking!  This semester was the first time I got a chance to go to one of his gallery openings in the capital city of our state.  He makes these giant pieces out of either clay (throwing vessels on the wheel) or metal (still vessels though!) so elegant-looking that he sells even his smallest pieces for more than a hundred dollars!  Everything we saw at that show was truly inspiring.

But I need my own style.  I need my own focus in clay.  This blog is about sharing my ideas and documenting my progress as I journey through self-discovery to find out what it is that can be done to transform clay into a steampunk medium.  Combining two passions together is my goal, and this rookie is going to find out what is possible.

This semester, it's about starting small, then growing.